There is something especially charming about a handmade bag with a big crochet bow. It feels playful without being childish, and it can make even a simple outfit look a little more special.
The best part? You don’t need complicated crochet stitches to make one.
This easy crochet bow bag pattern uses basic single crochet stitches, a long rectangular panel, and a separate decorative bow. The finished bag has a foldover flap, a button closure, and a matching strap that you can customize for your preferred carrying style.
If you can make a chain, work single crochet stitches, and sew two pieces together, you’re ready to try this project. If you’re still learning, I’ll explain the trickier parts along the way.
We’ll start with the bag body, shape the flap, crochet the oversized bow, and finish by assembling everything into a useful little handbag.
The tutorial also includes step-by-step image placements so you can see what each stage should look like.
What You’ll Learn
By the end of this crochet project, you’ll know how to:
- Crochet a sturdy handbag using simple single crochet rows.
- Keep the sides of a long crochet rectangle straight.
- Shape a triangular flap using basic decreases.
- Make a large decorative crochet bow from a flat rectangle.
- Gather and secure the center of a bow.
- Fold and seam the bag without twisting the fabric.
- Add a button closure and comfortable crochet strap.
- Adjust the bag’s size, colors, and finishing details.
Crochet Bow Bag Pattern at a Glance
Skill level
Confident beginner
Estimated time
6–9 hours
Finished size
Approx. 22.5 × 17 cm
Hook size
4.5 mm
Yarn weight
#4 medium
Construction
Flat rows + sewing
Measurements are estimates based on the suggested gauge. This original pattern is a working design draft rather than a physically sample-tested pattern.
Materials You’ll Need
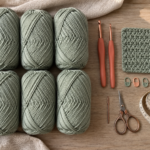
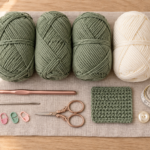
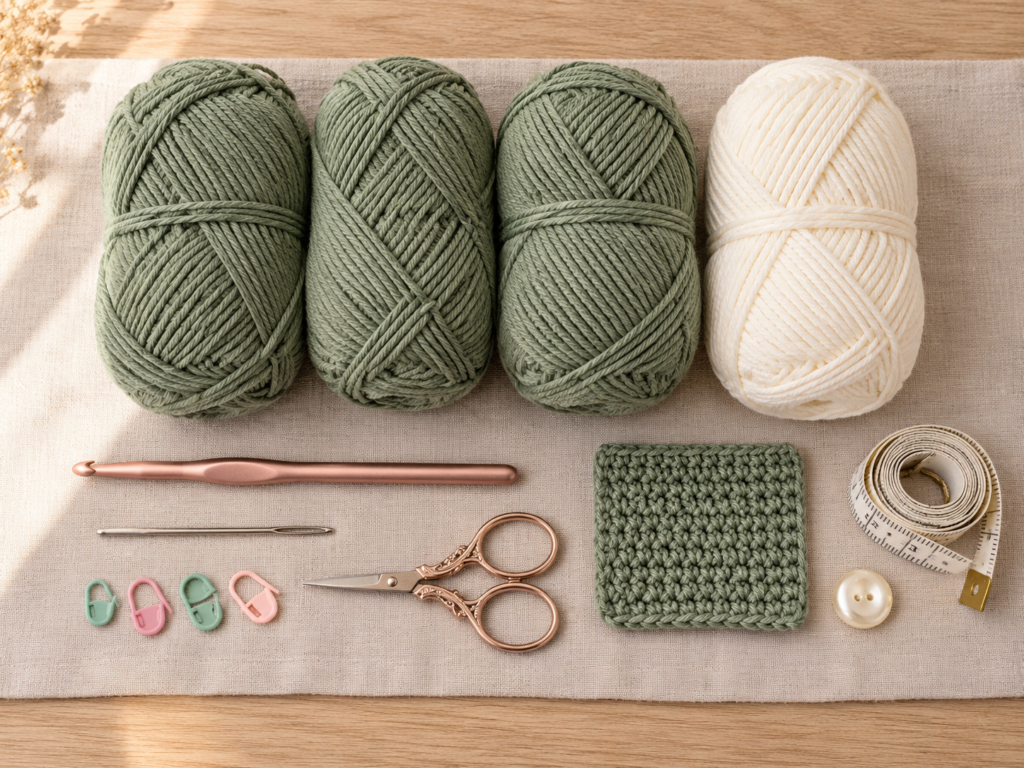
For this version, we’ll use dusty sage cotton yarn for the handbag and warm ivory yarn for the bow. These colors give the project a soft, timeless appearance, but you can substitute any combination you like.
Yarn
- Approximately 260–320 yards (238–293 m) of medium-weight #4 cotton yarn in dusty sage for the bag and strap.
- Approximately 80–120 yards (73–110 m) of medium-weight #4 cotton yarn in warm ivory for the bow and center band.
Actual yarn consumption depends on your tension, yarn construction, and strap length. Buying a little extra is sensible, especially if you’re using a yarn with a specific dye lot.
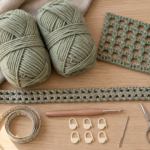
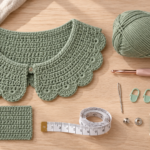
Tools and accessories
- 4.5 mm crochet hook
- Blunt tapestry needle
- Small sharp scissors
- Measuring tape
- Four locking stitch markers
- One 12–15 mm button
- Matching sewing thread and needle for the button
- Optional fabric lining or thin cotton reinforcement for the strap
Cotton is a good choice for this project because it generally holds its shape better than a very stretchy yarn. A tightly worked cotton-blend can also work beautifully.
The 4.5 mm hook is deliberately smaller than some standard recommendations for medium-weight yarn, helping create a denser fabric. Hook recommendations are guidelines, so use your actual gauge and fabric firmness to decide whether to adjust.
Crochet Abbreviations Used
This pattern uses US crochet terminology throughout.
| Abbreviation | Meaning |
|---|---|
| ch | Chain |
| sc | Single crochet |
| sc2tog | Single crochet two stitches together |
| sl st | Slip stitch |
| st / sts | Stitch / stitches |
| rep | Repeat |
| RS | Right side |
| WS | Wrong side |
In UK terminology, a US single crochet is called a double crochet. Be sure you’re following the correct terminology before starting.

Welcome to the Craft Yarn Council
How to make a single crochet
Insert your hook into the next stitch. Yarn over and pull up a loop.
You should have two loops on your hook.
Yarn over again and pull through both loops.
That’s one single crochet stitch.
How to make a single crochet decrease
A decrease joins two neighboring stitches into one.
Insert your hook into the first stitch, yarn over, and pull up a loop. Insert the hook into the next stitch, yarn over, and pull up another loop.
You now have three loops on your hook.
Yarn over and pull through all three loops.
You’ve completed one sc2tog, reducing your stitch count by one.
We’ll use this technique to create the triangular flap.
Before You Start
Check your gauge
For this project, aim for approximately:
16 single crochet stitches × 18 rows = 4 inches / 10 cm.
Make a small test swatch using the yarn and hook you plan to use. Work enough stitches and rows to measure a central 10 cm area without including the edges.
If your stitches are noticeably larger than the suggested gauge, try a slightly smaller hook. If your fabric is very stiff or your stitches are too small, increase your hook size.
The most important thing is that your bag fabric feels firm but not painfully difficult to crochet.
Understand the bag construction
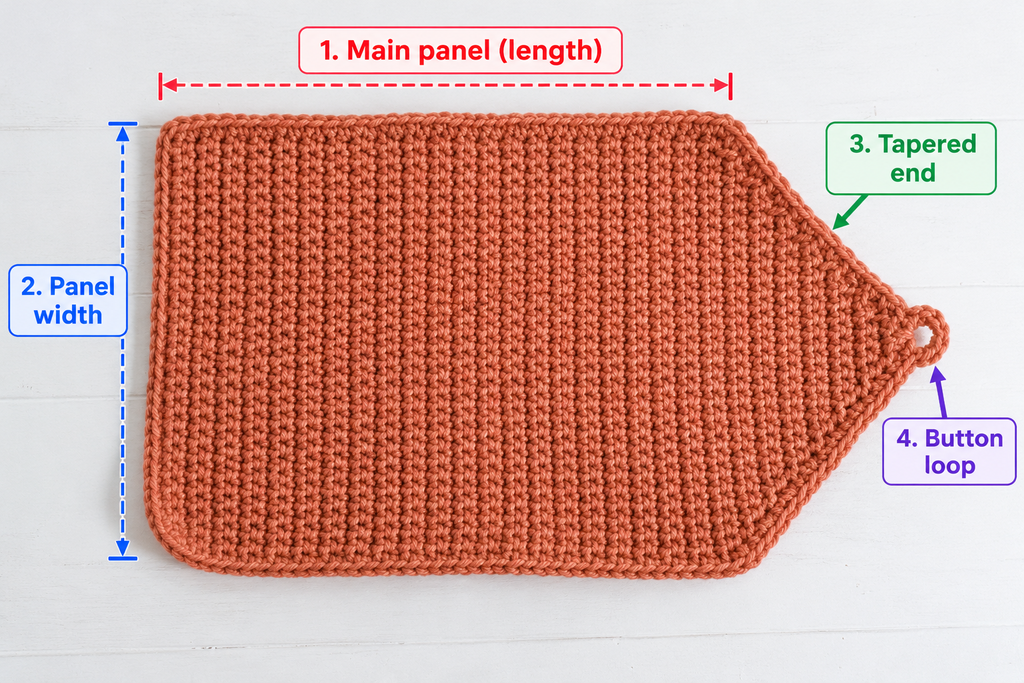
Instead of crocheting in continuous rounds, you’ll make one long rectangular panel.
The lower half becomes the front of the bag. The upper half becomes the back. A tapered section extending beyond the back forms the closure flap.
You’ll fold the rectangular section in half and sew the side edges together.
The bow is made separately, gathered at its center, and attached to the front.
This approach is beginner-friendly because you can see and measure the individual pieces before assembly.
Learn to count your stitches
Single crochet rows can be tricky to count at first because the final stitch sometimes hides near the turning chain.
After completing each row, count the V-shaped stitch tops.
Use a stitch marker in the first and last stitch if your edges tend to become uneven.
For the main body, you should always have 36 stitches in each row.
Keep your tension comfortable
You want the stitches to be close together, but you should still be able to insert your hook without forcing it.
Very tight stitches can make your hands tired and cause the fabric to curl. Very loose stitches may leave visible holes between rows.
If the bottom edge curves slightly, don’t worry immediately. Check your stitch count and allow the fabric to relax before deciding whether something is wrong.
Choose the right side
Both sides of ordinary single crochet fabric can look attractive.
Choose whichever side you prefer as the exterior and mark it before assembling the bag. This makes it easier to keep the bow and closure on the correct side.
Step-by-Step Crochet Bow Bag Tutorial
Step 1: Make the foundation chain
Start with your dusty sage yarn.
Make a slip knot and place it on your 4.5 mm crochet hook.
Chain 37.
Try to keep the chains the same size. You don’t need to pull them tight after every stitch.
Once you’ve completed the chain, lay it on the table and check that it isn’t twisted.
For the first row, insert your hook into the second chain from the hook.
Work one single crochet into that chain and one single crochet into each remaining chain.
At the end of the row, you should have:
Row 1: 36 sc.
This row determines the width of your handbag.
Beginner tip: If your foundation chain feels too tight, use a 5 mm hook just for the chain, then switch back to 4.5 mm for the first row.
Common mistake to avoid: Don’t crochet into the first chain directly beside your hook. Skipping that chain gives the correct stitch count.
Step 2: Crochet the long bag body
Now we’ll build the main fabric.
After finishing Row 1, chain one and turn your work.
Insert your hook into the first single crochet stitch.
Work one single crochet in every stitch across.
You should have 36 stitches again.
Continue using the following instructions:
Rows 2–60: Ch 1, turn, sc in each of the 36 stitches across.
The turning chain does not count as a stitch.
As you continue, the small rectangle will gradually become a long strip of fabric.
Don’t worry if it doesn’t look like a bag yet. The transformation happens during assembly.
At approximately the halfway point, after Row 30, you can fold the panel temporarily to get an idea of the finished bag height.
Then unfold it and continue working until you complete Row 60.
At the suggested gauge, the long rectangular section should measure approximately 22.5 cm wide and 33.3 cm long.
Once folded, this creates a pouch approximately 16.7 cm tall.
Beginner tip: Measure the fabric every ten rows and compare the two long edges. Both edges should stay reasonably straight.
Common mistake to avoid: Accidentally adding a stitch at the turning chain will make the panel wider over time. Always work into the actual first stitch of the row.
Check your single crochet stitches
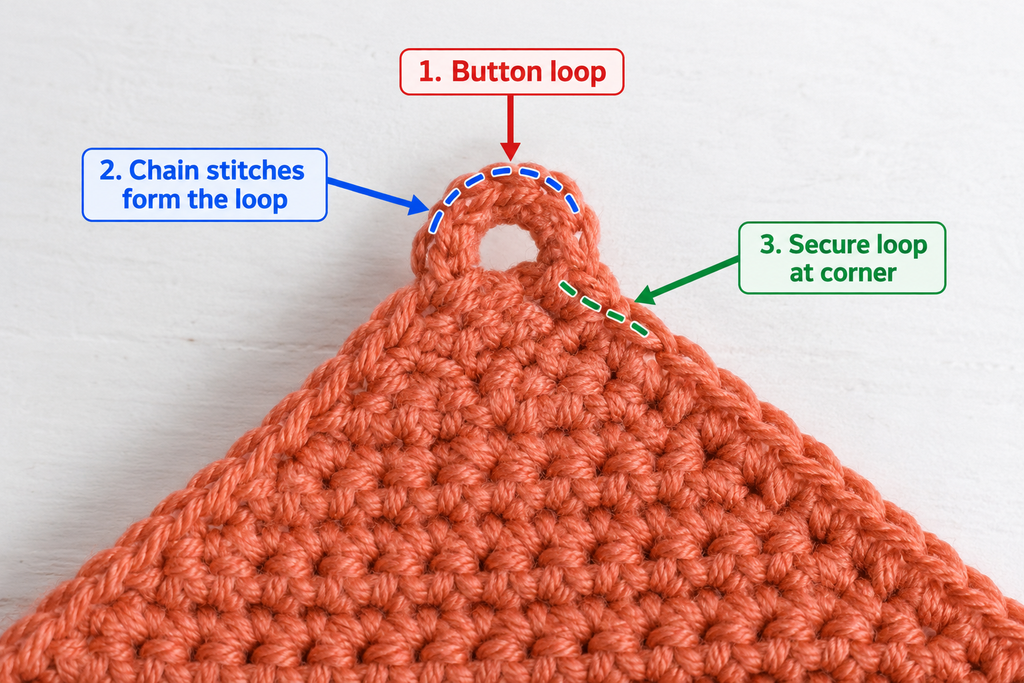
Before moving on, look closely at the top edge of your panel.
Each stitch should form a small V.
When working the next row, your hook normally passes beneath both loops of that V.
Working through both loops creates a fairly even fabric. If you accidentally work through only one loop repeatedly, you may notice a raised horizontal ridge.
That isn’t necessarily wrong in crochet, but it will change the appearance of this particular bag.
Step 3: Shape the triangular closure flap
The next section will create the flap that folds over the front of the bag.
You currently have 36 stitches.
We’ll decrease at both ends of every row so the fabric gradually becomes narrower.
For Row 61:
Chain one and turn.
Work sc2tog over the first two stitches.
Single crochet in each of the next 32 stitches.
Work sc2tog over the final two stitches.
You now have 34 stitches.
Continue decreasing at both ends of every row.
The stitch counts should follow this sequence:
| Row | Stitches remaining |
|---|---|
| 61 | 34 |
| 62 | 32 |
| 63 | 30 |
| 64 | 28 |
| 65 | 26 |
| 66 | 24 |
| 67 | 22 |
| 68 | 20 |
| 69 | 18 |
| 70 | 16 |
| 71 | 14 |
| 72 | 12 |
| 73 | 10 |
| 74 | 8 |
| 75 | 6 |
| 76 | 4 |
| 77 | 2 |
For every row, chain one, turn, work one sc2tog at the beginning, single crochet across the middle stitches if any remain, and work one sc2tog at the end.
When only four stitches remain before the final decrease row, simply work two sc2tog stitches to finish with two stitches.
The flap should now form a neat triangular shape.
Add the button loop
After completing the final row, chain six.
Slip stitch into the first of the two remaining stitches at the tip to create a small loop.
Check the loop against your button before fastening off. You may need five, seven, or eight chains instead, depending on the button size and your tension.
Fasten off and secure the yarn tail.
Beginner tip: Count the stitches after every decrease row. Fixing a missed decrease immediately is much easier than discovering the problem ten rows later.
Common mistake to avoid: Don’t make the button loop so loose that it slips off the button without resistance.
Step 4: Crochet the oversized bow rectangle
Set the main bag panel aside.
Pick up your warm ivory cotton yarn.
We’re going to make the decorative bow as a separate rectangle. This is much easier for beginners than trying to crochet complicated bow-shaped pieces directly onto the bag.
Make a slip knot.
Chain 45.
Work one single crochet into the second chain from the hook and every remaining chain.
You should have 44 single crochet stitches.
Continue as follows:
Rows 2–14: Ch 1, turn, sc in every stitch across. (44 sc)
Fasten off, leaving a tail for weaving in.
The finished bow rectangle should measure approximately 27.5 cm wide and 7.8 cm tall if your gauge matches the main fabric.
Because the bow is wider than the bag, its loops will extend slightly beyond the sides, giving it an oversized appearance.
Lay the bow rectangle horizontally across the lower portion of the bag’s future front panel to check the proportions.
Don’t sew it in place yet.
Beginner tip: The bow should be wide enough to create generous loops on both sides of the gathered center.
Common mistake to avoid: Avoid making the bow rectangle much shorter than the bag width. It may look like a small applique instead of a statement bow.
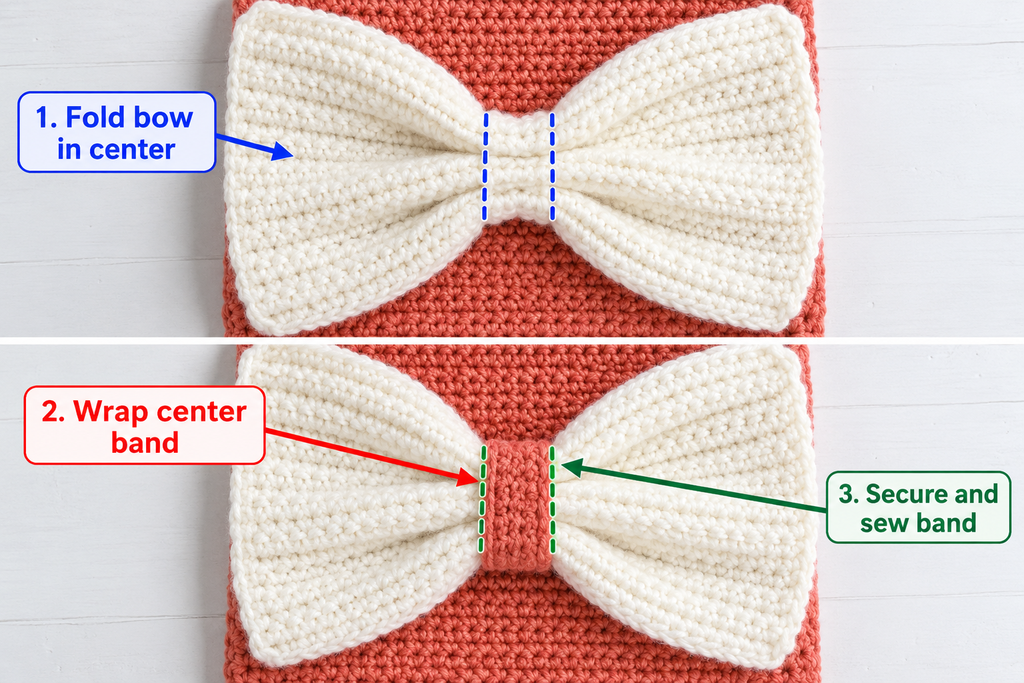
Step 5: Make the bow center band and gather the bow
A beautiful crochet bow doesn’t need complicated shaping. The secret is how you gather the center.
First, crochet a narrow center band using ivory yarn.
Chain seven.
Work one single crochet into the second chain from the hook and each remaining chain.
You should have six stitches.
Continue:
Rows 2–12: Ch 1, turn, sc in each stitch across. (6 sc)
Fasten off, leaving a long sewing tail.
Your center band should be approximately 3.75 cm wide and 6.7 cm long, depending on your gauge.
If it doesn’t wrap comfortably around your gathered bow, add a few more rows before fastening off.
Gather the bow
Place the large bow rectangle on the table with its longer edges running horizontally.
Find the midpoint of its length.
Using your fingers, pinch the fabric together at the center.
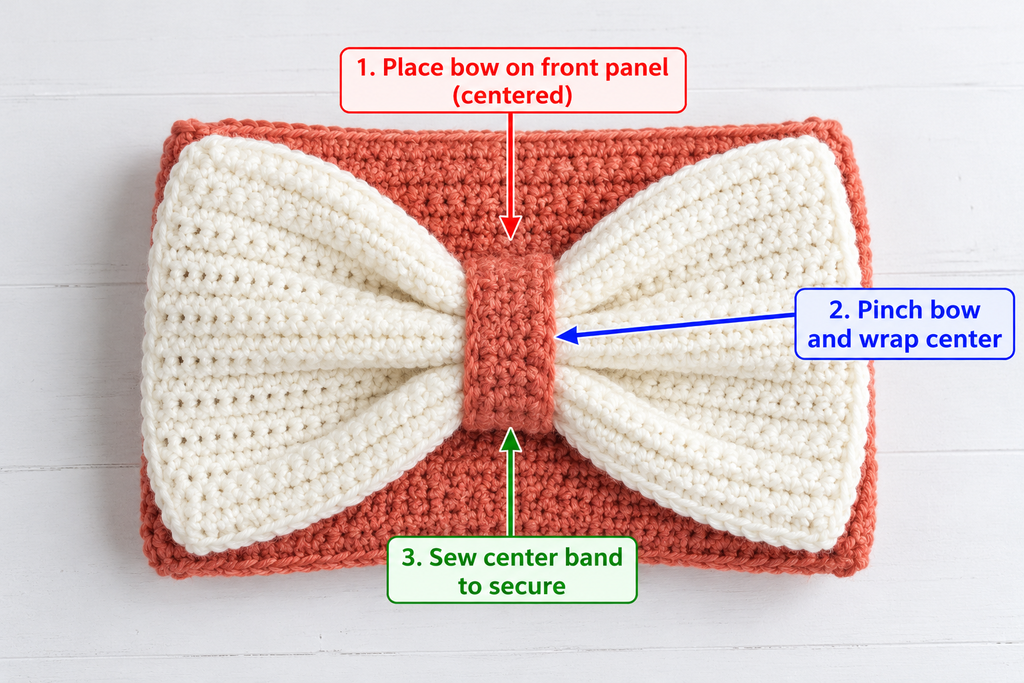
Fold the center into two or three small accordion pleats. The outer portions should spread naturally into a left loop and a right loop.
Hold the gathered center firmly.
Wrap your narrow crochet band around the pinched section, bringing its ends together at the back.
Use the long yarn tail to sew the band closed.
Adjust the loops until both sides look balanced.
Attach the bow to the bag
Temporarily fold the bag to identify its front.
Place the bow low enough that the flap and button won’t cover the gathered center. For this size, try positioning the bow center about 11–12 cm below the top front opening.
Open the bag flat again.
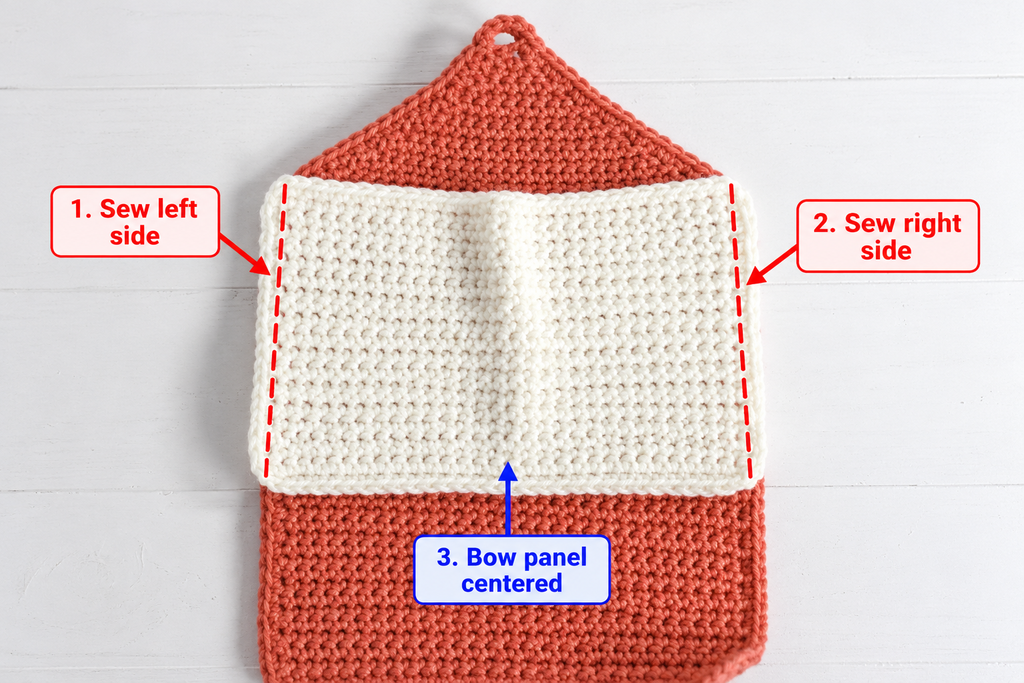
Sew the back of the gathered bow center to the front section of the main panel using several small hidden stitches.
Add one or two discreet securing stitches beneath each loop if you want the bow to stay neatly spread.
Avoid catching the future side-seam allowances.
Beginner tip: Pin the bow and fold the flap down before sewing permanently. This helps you check the placement.
Common mistake to avoid: Pulling the center band too tightly can make the bow look like two narrow tubes. Keep the center secure while allowing the loops to remain full.
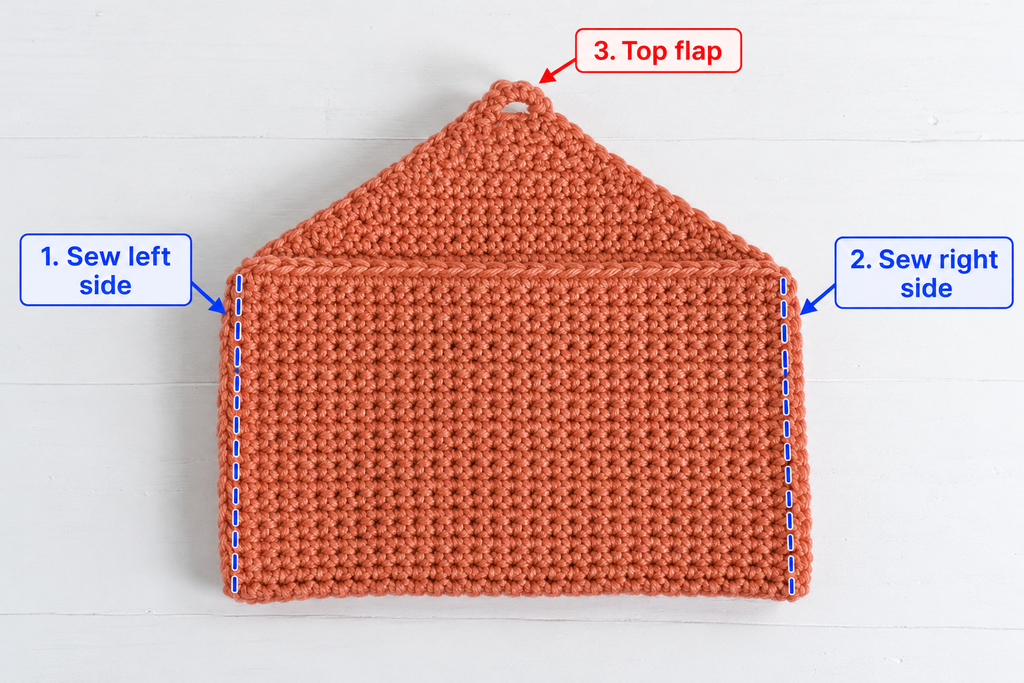
Step 6: Fold the bag into shape
Now your project is ready to become a handbag.
Lay the main panel flat with the bow attached to the section that will become the front.
The first 60 rows form the rectangular body.
The triangular section extends beyond those rows and will become the closure flap.
Fold the rectangular portion in half at the midpoint between Rows 30 and 31.
Bring the foundation-chain edge up to meet the top of the rectangular section, just below the flap.
The front and back panels should now be approximately equal in height.
Make sure the bow is on the exterior side when the bag is eventually turned right side out.
Before sewing, temporarily turn the bag so the right sides face each other. The bow should be sandwiched inside, kept clear of the side seams.
Place stitch markers at the two upper side corners and near the lower folded corners.
Check that the sides line up.
Beginner tip: Take a minute to compare both sides before picking up your needle. An uneven fold will affect the finished bag more than a slightly imperfect crochet stitch.
Common mistake to avoid: Don’t fold the triangular flap inside the pouch. It should remain free above the back panel.
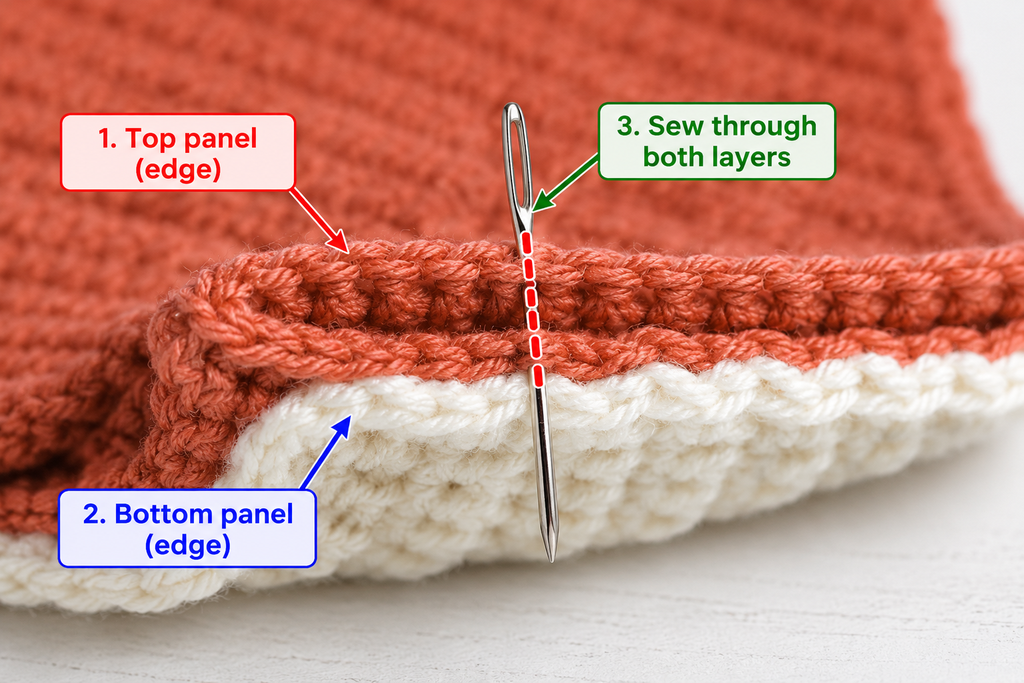
Step 7: Sew the side seams
Thread your tapestry needle with a length of dusty sage yarn.
Keep the bag folded with the right sides together.
Begin at one bottom corner.
Sew upward through the corresponding edge stitches of both layers using a whip stitch or mattress-style seam.
Try to catch approximately one row-end on each side with each stitch so the fabric doesn’t gather unevenly.
Continue until you reach the top opening.
Secure the yarn on the inside.
Repeat on the other side.
Do not sew across the top opening.
Once both side seams are finished, turn the bag right side out.
Gently push the lower corners outward with your fingers to define the shape.
The bag should now resemble a small pouch with a triangular flap.
Check the interior to make sure no bow stitches or loose yarn ends have been accidentally caught in the seams.
Beginner tip: Use matching yarn for the seams. Small differences in stitch size will be less noticeable.
Common mistake to avoid: Pulling the sewing yarn too tightly can shorten the sides and cause puckering. The seam should be firm without squeezing the fabric.
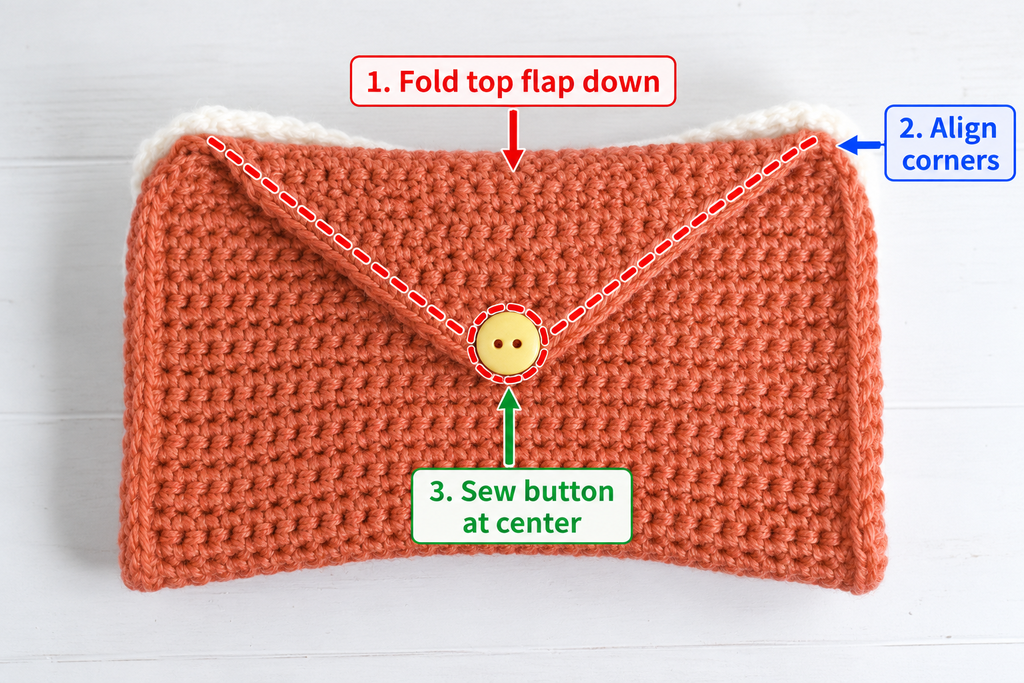
Step 8: Add the button closure
Fold the triangular flap down over the front of the bag.
Allow it to rest naturally without stretching.
Find the point where the button loop reaches the front panel.
Mark this position with a stitch marker.
Open the flap again.
Using a sewing needle and matching thread, attach your button at the marked location.
For extra security, you can sew through a small piece of fabric reinforcement on the inside of the bag.
Close the flap and test the button loop.
The loop should fit over the button without excessive stretching, but it shouldn’t fall off easily.
If the loop is too large, carefully undo it and remake it with fewer chains.
If it’s too small, remake it with an extra chain or two.
Beginner tip: Test the closure with a few small items inside the bag. A slightly filled pouch can change how the flap sits.
Common mistake to avoid: Sewing the button before checking the flap’s natural resting position can make the closure crooked.
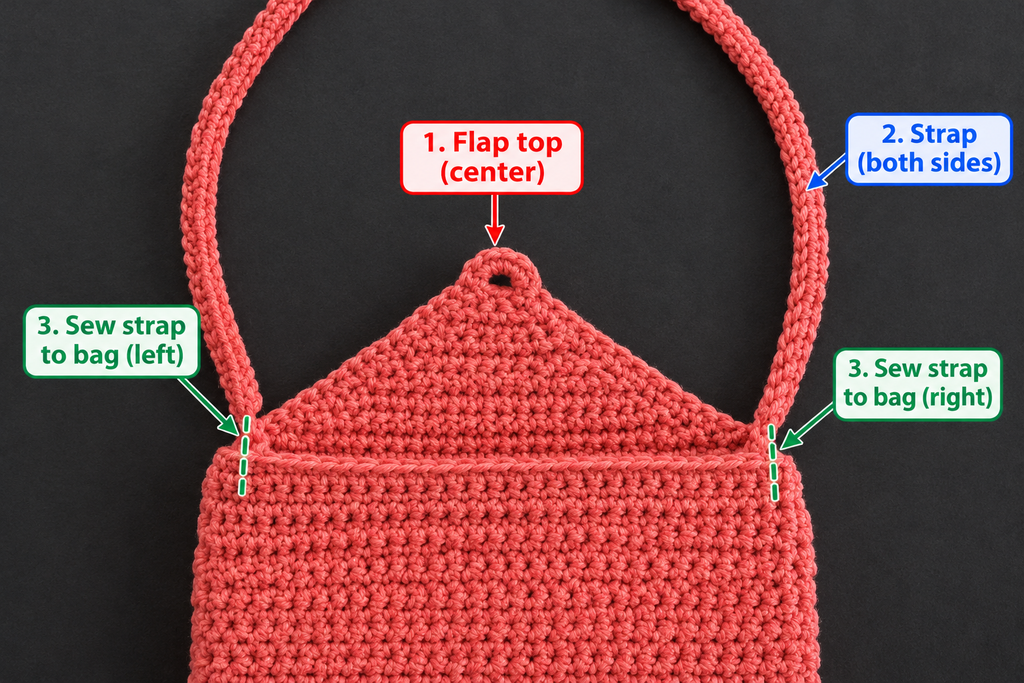
Step 9: Crochet and attach the strap
You can carry this bag as a clutch, but a matching crochet strap makes it more versatile.
For a simple shoulder strap, use dusty sage yarn.
Leave a long starting tail for sewing.
Chain 105.
Work one single crochet into the second chain from the hook and each remaining chain.
You should have 104 stitches.
Continue:
Rows 2–4: Ch 1, turn, sc in every stitch across. (104 sc)
Fasten off, leaving another long sewing tail.
Your strap should be approximately 65 cm long at the suggested gauge, although it may stretch slightly with use.
Attach the strap
Position one strap end inside the left upper side of the bag, approximately 2 cm below the opening.
Sew the strap securely to the bag using several passes of matching yarn.
A small rectangular sewing outline with diagonal reinforcement stitches can help distribute the weight.
Repeat on the opposite side.
Before finishing, hold the bag by its strap to check whether the attachments feel secure.
If you want to carry heavier items, reinforce the strap with cotton tape or a fabric lining.
Beginner tip: For a shorter wristlet, use approximately 45 starting chains instead of 105, then fold the finished strap into a loop and secure both ends inside one side of the bag.
Common mistake to avoid: Don’t attach the strap with only one or two stitches. The attachment points carry most of the weight when the bag is in use.
Pattern Notes and Stitch Counts
Here are the important numbers to keep handy while crocheting.
| Piece | Instructions | Stitch count |
|---|---|---|
| Main body | Ch 37, work 60 rows | 36 sc per row |
| Triangular flap | Rows 61–77, decrease both edges | 34 down to 2 |
| Bow rectangle | Ch 45, work 14 rows | 44 sc per row |
| Bow center band | Ch 7, work 12 rows | 6 sc per row |
| Shoulder strap | Ch 105, work 4 rows | 104 sc per row |
Turning chains: The chain-one turning chain does not count as a stitch.
Repeat pattern: All straight sections use one single crochet in every stitch. The triangular flap decreases by two stitches per row.
Right and wrong sides: Choose the exterior surface before attaching the bow. Keep that surface facing outward after assembly.
Stitch count checks: If the main body has fewer or more than 36 stitches before you begin shaping, correct it first.
Size adjustments: The main body uses an even number of stitches so the flap can decrease symmetrically. If you change the starting width, recalculate the number of decrease rows.
Common Beginner Mistakes and How to Fix Them
1. The bag gets wider or narrower
This usually happens when you accidentally skip the first stitch or crochet into the turning chain.
Fix: Count the stitches at the end of each row. You should always have 36 stitches throughout the rectangular body.
2. The crochet fabric curls
A little curling is normal, especially with cotton and tight single crochet stitches.
Fix: Check your tension. If the fabric feels extremely stiff, try a slightly larger hook. Gentle blocking may help relax minor curling.
3. The triangular flap looks uneven
You may have forgotten a decrease on one side.
Fix: Check the stitch-count table. Every flap row should contain two fewer stitches than the previous row.
4. The bow loops are different sizes
The gathered center may be positioned slightly off-center.
Fix: Measure the bow rectangle, mark the exact midpoint, and gather the fabric there. Adjust the pleats before sewing the band closed.
5. The bag sides pucker after sewing
The sewing yarn may be pulled too tightly, or the rows may not be aligned correctly.
Fix: Undo the affected seam section, realign the edges, and resew with relaxed tension.
6. The strap stretches too much
Cotton straps can lengthen under weight, especially when made with loose stitches.
Fix: Use firm tension, add another row to increase the strap width, or reinforce the underside with cotton tape.
7. The button doesn’t stay closed
The loop may be too large, or the button may be positioned too high.
Fix: Adjust the chain-loop size and test the closure with the bag lightly filled before permanently securing the button.
How to Customize Your Crochet Bow Bag
One of the nicest things about this project is how easily you can make it your own.
Try different color combinations
For a soft romantic look, use blush pink for the bag and cream for the bow.
For a more modern handbag, try chocolate brown with a matching brown bow.
Black and ivory create a classic contrast, while lavender and pale lilac give the bag a playful springtime appearance.
You can also crochet the bow in the same color as the bag for a more understated, textured design.
Make a smaller bag
To make a mini version, start with fewer foundation chains and work fewer rows for the main rectangular body.
For example, you could use a 28-stitch-wide panel, adjust the rectangular length to your preferred finished height, and decrease symmetrically to form the flap.
Remember to make the bow proportionally smaller.
A mini bow bag is lovely for carrying keys, lipstick, and a small cardholder.
Make a larger handbag
Increase the foundation chain until the panel reaches your preferred width.
Work the rectangular section until it measures approximately twice your desired finished bag height.
Keep in mind that a larger bag may need a stronger strap and fabric lining.
Add a decorative border
For a polished edge, you can work a round of single crochet around the opening where accessible before attaching the strap.
If you enjoy decorative crochet stitches, a simple reverse single crochet edging can create a cord-like finish.
Practice the edging on a swatch first, since tight edging can pull the opening inward.
Add texture
The simplest version uses ordinary single crochet, but you could experiment with back-loop-only single crochet for a ribbed appearance.
If you change the stitch pattern, make a new gauge swatch. Textured stitches may change the fabric’s width, height, and flexibility.
Add a fabric lining
A cotton lining can help prevent small objects from slipping through the crochet fabric and can give the bag a more finished interior.
Cut a fabric rectangle slightly smaller than the interior dimensions, sew its side seams, fold the upper raw edge inward, and hand-sew it just below the bag opening.
Keep the lining clear of the button closure and strap attachment points.
Handmade gift ideas
This bag makes a thoughtful handmade gift for birthdays, holidays, or someone who loves bows and coquette-inspired accessories.
For a matching set, crochet a small bow keychain or hair accessory using leftover yarn.
Finishing Instructions
Step 10: Weave in the ends and shape the finished bag
You’re almost done!
Turn the bag inside out one final time and look for any loose yarn tails.
Thread each tail through a tapestry needle and weave it through several neighboring stitches.
Change direction at least once to help secure it.
Trim the excess yarn carefully.
Turn the bag right side out again.
Check that the side seams lie flat and the bottom corners have a reasonably even shape.
Arrange the bow loops so they spread symmetrically across the front.
If one loop keeps folding inward, add a small hidden stitch to secure it to the front panel.
Make sure the center band is neat and its seam is hidden at the back.
Blocking
If the bag looks slightly uneven, lightly dampen it and gently shape it with your hands.
You can place a clean folded towel inside the bag while it dries to help maintain its shape.
Avoid aggressively stretching the fabric, particularly around the flap and strap attachments.
Washing and care
Follow the care instructions on your yarn label.
For a bag with a sewn-on button and decorative bow, gentle hand washing is usually the safest option.
Reshape the bag while damp and allow it to dry flat.
Avoid hanging it by the strap while wet, since the weight of the water may stretch the crochet.
If you’re making the bag for a young child, avoid detachable small embellishments and take extra care with button security. Small parts can be a choking hazard.
Quick Printable-Style Pattern Summary
Easy Crochet Bow Bag — Quick Reference
Skill level: Confident beginner
Finished size: Approximately 22.5 cm wide × 17 cm tall
Materials: Medium-weight cotton yarn, 4.5 mm hook, tapestry needle, scissors, markers, button
Stitches: Ch, sc, sc2tog, sl st
Main body: Ch 37; Row 1: 36 sc; Rows 2–60: 36 sc each row
Flap: Rows 61–77: decrease once at each edge of every row, ending with 2 sc; add button loop
Bow: Ch 45; work 14 rows of 44 sc
Center band: Ch 7; work 12 rows of 6 sc
Strap: Ch 105; work 4 rows of 104 sc
Assembly: Gather bow, attach to front, fold body, sew side seams, add button and strap
Finishing: Weave in ends, adjust bow, lightly block if needed
Frequently Asked Questions
1. Is this crochet bow bag pattern suitable for beginners?
Yes, it’s suitable for a confident beginner who knows how to chain, single crochet, and turn rows.
The only slightly more advanced technique is the single crochet decrease used to shape the flap.
If you’ve already completed a washcloth or simple scarf, this is a reasonable next project.
The sewing stage may take a little patience, but the construction is straightforward.
2. What is the best yarn for a crochet bow bag?
Medium-weight cotton is a practical choice because it creates defined stitches and generally has less stretch than very soft acrylic.
Cotton-blend yarn can also work well.
For a structured handbag, choose yarn that produces a fairly firm fabric rather than something extremely fluffy or slippery.
3. How much yarn do I need to crochet a bow bag?
For this version, allow approximately 260–320 yards of the main color and 80–120 yards of the contrasting bow color.
These amounts are estimates.
A larger bag, thicker strap, or different crochet tension may require more yarn.
4. Can I make this crochet bow bag without sewing?
This particular version requires sewing to close the side seams, attach the bow, and secure the strap.
However, the main bag body is made from one continuous piece, so there are fewer separate bag panels to assemble.
If you want a project with no sewing at all, consider a bag crocheted in continuous rounds with an integrated strap.
5. Can I turn this into a crochet crossbody bag?
Yes.
Simply make the strap longer by adding more foundation chains.
Measure your preferred crossbody length before crocheting, remembering that the finished strap may stretch slightly.
For a long crossbody strap, adding reinforcement is especially helpful.
6. Why is my crochet bow not holding its shape?
The bow may be too loosely crocheted, the center band may be too wide, or the loops may not be secured sufficiently.
Try gathering the center more firmly and adding small hidden stitches beneath the loops.
A light blocking can also help, but avoid flattening the gathered center.
7. How can I make the bag more durable?
Use firm cotton yarn, keep your stitches even, reinforce the strap attachments, and consider adding a fabric lining.
Don’t overload the bag with heavy objects unless you’ve strengthened the construction.
A crochet bow bag works particularly well as a lightweight accessory for everyday essentials.
Conclusion
This crochet bow bag is a lovely way to turn simple stitches into something practical and decorative.
The long single crochet panel keeps the main construction manageable, while the oversized bow adds personality without requiring complicated stitch patterns.
Once you’ve finished your first bag, try another in a different color combination or experiment with a shorter wristlet strap.
Save this crochet bow bag pattern for your next handmade accessory project, and consider pairing it with a matching crochet bow keychain or hair clip.