There’s something especially cheerful about a handmade sunflower. The golden petals, rich brown center, and little green leaves make it one of those crochet projects that looks beautiful on almost anything.
And the best part? You don’t need to make a complicated bouquet or learn advanced stitches to crochet one.
This easy crochet sunflower pattern teaches you how to create a flat flower appliqué using a small circle for the center and simple stitch combinations for the petals. It’s a lovely project for practicing crochet in the round, changing yarn colors, and shaping decorative motifs.
You can sew your finished sunflower onto a tote bag, decorate a blanket, add it to a handmade card, or make several for a cheerful garland.
In this beginner-friendly tutorial, we’ll work through the whole process together, from making the first magic ring to adding the final green leaves. You’ll also find guidance for avoiding curling, keeping the petals evenly spaced, and finishing your flower neatly.
This pattern uses US crochet terminology throughout.
What You’ll Learn
By the end of this tutorial, you’ll know how to:
- Start a crochet sunflower using a magic ring.
- Make a flat brown center with simple increases.
- Work twelve pointed yellow petals around the center.
- Create small oval leaves using a foundation chain.
- Change yarn colors without leaving visible gaps.
- Weave in yarn ends and shape a finished crochet motif.
- Adjust the yarn and hook size to create different sunflower decorations.
The pattern is especially suitable if you already know how to make a chain and single crochet but want a small project that introduces taller stitches.
Crochet Sunflower Pattern at a Glance
Difficulty
Confident beginner
Time
45–90 minutes
Finished size
Approximately 8–10 cm
Hook
3.5 mm
Center
3 rounds, 24 sts
Petals
12 pointed petals
Finished size is an estimate using DK cotton yarn and will vary with yarn thickness and tension. This written pattern is a new proposed design and has not been independently pattern-tested.
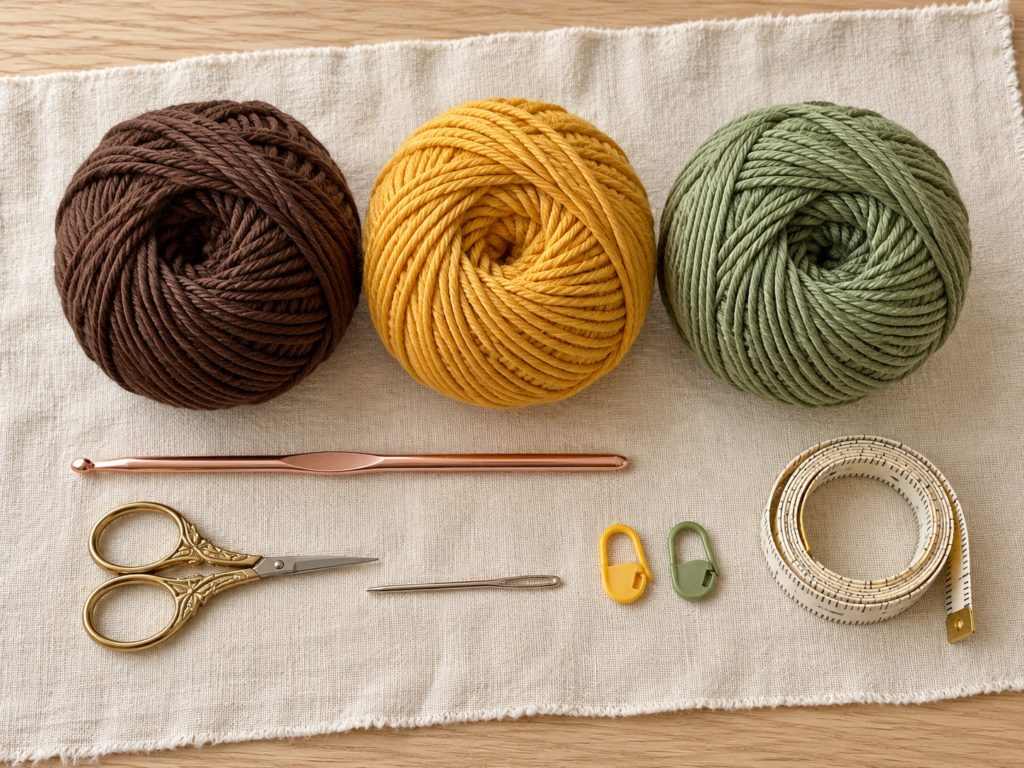
Materials You’ll Need
You won’t need much yarn for this sunflower, which makes it an excellent stash-busting project.
Yarn
Choose small amounts of DK-weight cotton yarn in three colors:
- Espresso brown for the flower center.
- Golden yellow for the sunflower petals.
- Sage green for the optional leaves.
Cotton works particularly well because its stitch definition makes it easy to see where your hook should go. It also tends to hold the shape of a flat appliqué better than very fluffy yarn.
You can use light worsted yarn if that’s what you have. Just expect the finished flower to be slightly larger.
Tools
- 3.5 mm crochet hook
- Scissors
- Blunt tapestry needle
- Two stitch markers
- Measuring tape, if you want to compare flower sizes
- Rustproof blocking pins and a soft blocking mat, optional
A stitch marker is particularly helpful when learning to count rounds. Even though this pattern uses joined rounds, marking your first actual stitch will make it much easier to find the joining point.
Crochet Abbreviations Used
These are the abbreviations you’ll see throughout the pattern.
| Abbreviation | Meaning (US terms) |
|---|---|
| MR | Magic ring |
| ch | Chain |
| sc | Single crochet |
| hdc | Half double crochet |
| dc | Double crochet |
| tr | Treble crochet |
| sl st | Slip stitch |
| st / sts | Stitch / stitches |
| inc | Increase |
| rep | Repeat |
An increase means working two stitches into the same stitch from the previous round.
A picot is a small loop or point made with chain stitches and a slip stitch. We’ll use it to create the little pointed tip at the end of each sunflower petal.
US vs. UK crochet terms
This tutorial uses US crochet terminology.
In UK crochet instructions, a US single crochet is called a double crochet, a US double crochet is called a treble crochet, and a US treble crochet is called a double treble crochet.
If you’re following along with a UK tutorial or crochet book, check the terminology before starting. Mixing these terms changes the height of the stitches and will affect the shape of your petals.
Before You Start
Choose yarn that shows the stitches
Smooth cotton is ideal for your first sunflower. It makes the structure of the brown center clear and helps you distinguish the taller petal stitches.
Try to avoid very fluffy, fuzzy, or novelty yarn until you’ve made the pattern at least once. Those textures can hide the tops of the stitches, especially when you’re crocheting into the same stitch more than once.
Your tension matters more than exact gauge
Gauge is not critical for a decorative appliqué, but your flower should lie reasonably flat.
If your brown circle begins to form a little bowl, loosen your tension or try a slightly larger hook. If the circle becomes very loose and wavy, try using a smaller hook.
The goal is a center that’s firm enough to support the petals without being stiff.
Count the actual stitches
The brown center is made in three rounds:
- Round 1: 8 stitches
- Round 2: 16 stitches
- Round 3: 24 stitches
Those 24 stitches are important because the petal round uses two center stitches for each petal.
Twenty-four stitches divided into groups of two gives you twelve petals.
The joining slip stitch and beginning chain do not count as stitches in these center rounds.
Keep the center flat
The sunflower center should resemble a small, neat disk rather than a cup.
Work at a comfortable pace and spread the stitches gently with your fingers after each round. Don’t pull every loop extremely tight, even when you want the stitches to look neat.
Prepare your colors
For a classic sunflower, dark brown and golden yellow look beautiful together.
If you want a slightly softer flower, choose caramel brown and buttery yellow. For something more vintage, mustard yellow and olive green are a lovely combination.
Whatever colors you choose, use the same yarn weight for all parts so that the petals and leaves stay in proportion.
Step-by-Step Crochet Sunflower Tutorial
We’ll make the brown center first, add the yellow petals, crochet the leaves separately, and finally assemble the finished flower.
Part 1: Crochet the Brown Sunflower Center
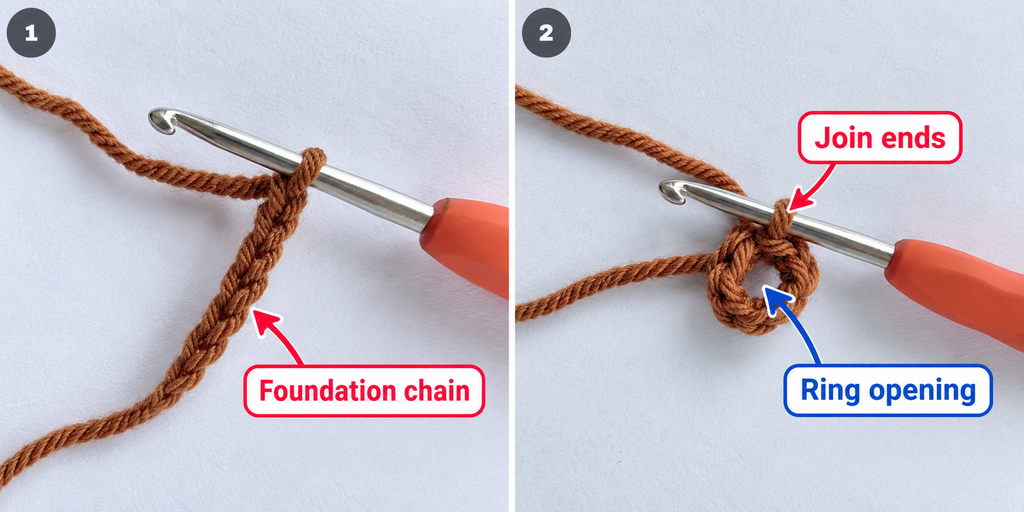
Step 1: Make a magic ring
Start with your brown yarn.
Wrap the yarn around your fingers to create an adjustable loop. Insert your hook into the loop, catch the working yarn, and pull a loop through.
Chain 1 to secure your starting position. This chain does not count as a stitch.
Don’t pull the ring closed yet. You need enough room to crochet your first eight stitches into the center.
If you’ve never made a magic ring, practice opening and tightening it a couple of times before adding the stitches. Once you understand how the tail controls the opening, this technique becomes much easier.
Beginner tip: Leave a yarn tail of approximately 10–15 cm. A longer tail is easier to hold while you tighten the ring and secure it later.
Common mistake to avoid: Crocheting into only one of the strands along the ring can make the starting loop difficult to close. Check that you’re working around the ring as intended and that the adjustable tail remains free to pull.
Step 2: Crochet eight stitches into the ring
Work eight single crochet stitches into the magic ring.
To make a single crochet, insert your hook into the ring, yarn over, and pull up a loop. You’ll have two loops on your hook. Yarn over again and pull through both loops.
Repeat this until you have eight stitches.
Now gently pull the yarn tail to close the hole in the middle.
Join the round with a slip stitch into the top of the first single crochet.
Round 1: 8 sc in MR, join with sl st. (8 sts)
The center should be a small circle with eight visible V-shaped stitches around the edge.
Beginner tip: Count your stitches before joining. It’s easier to fix a missing stitch now than after you’ve completed several rounds.
Common mistake to avoid: Don’t mistake the beginning chain for the first single crochet when joining the round.
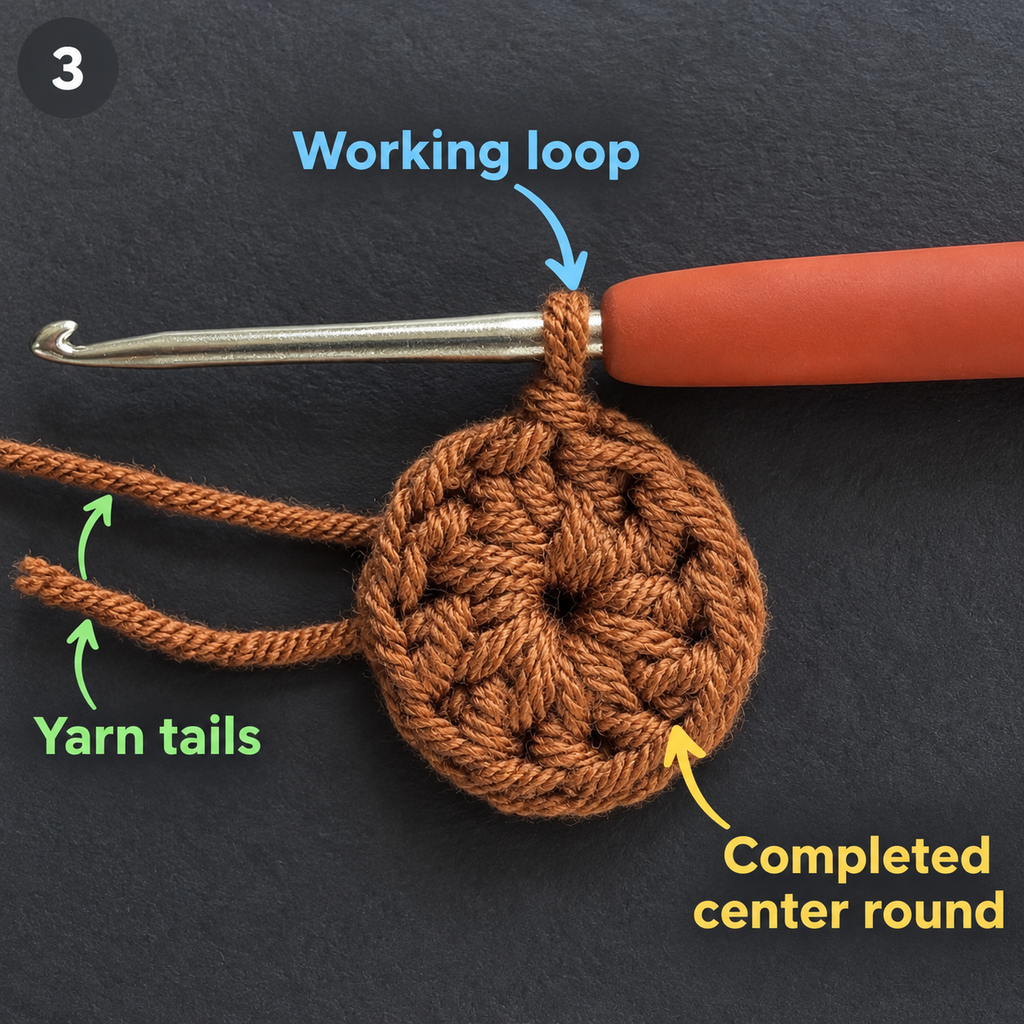
Step 3: Increase to make the center wider
Now we’ll expand the circle.
Chain 1. Work two single crochet stitches into the first stitch. Continue working two single crochet stitches into every stitch around.
When you reach the end, you’ll have sixteen single crochet stitches.
Join with a slip stitch into the first single crochet.
Round 2: Ch 1, 2 sc in each st around, join. (16 sts)
Notice how the circle begins to grow.
Working two stitches into each stitch creates enough extra fabric for the circle to become wider without pulling inward.
Beginner tip: Make sure both stitches of each increase go into the same V-shaped top of the stitch below.
Common mistake to avoid: If you accidentally work only one stitch in one of the eight positions, you’ll finish with fifteen stitches instead of sixteen. Count before moving on.
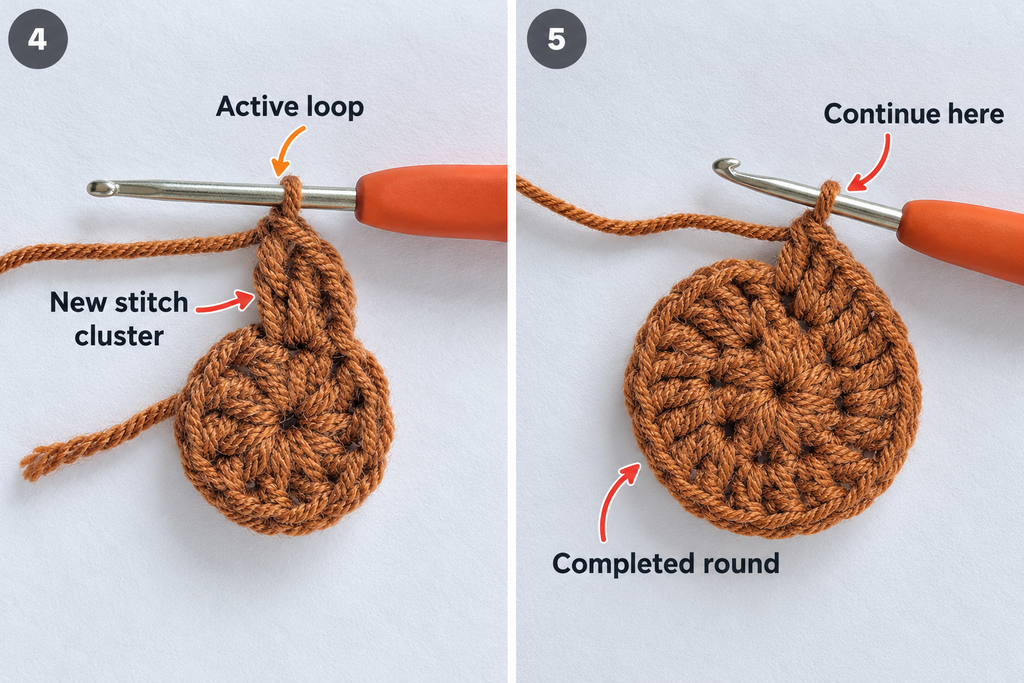
Step 4: Complete the brown center
The third round gives the sunflower center its final size.
Chain 1.
Work two single crochet stitches into the first stitch, then one single crochet into the next stitch.
Repeat that two-stitch sequence around the entire circle.
You’ll make eight increases in total, bringing the stitch count to twenty-four.
Join with a slip stitch into the first single crochet.
Round 3: Ch 1, [2 sc in next st, 1 sc in next st] eight times, join. (24 sts)
You should now have a flat brown circle with a neat outer edge.
Lay it on the table and gently smooth it with your fingertips. It doesn’t need to be perfectly rigid or completely flat, but it shouldn’t pull tightly into a cup.
This is the foundation that will support all twelve petals.
Beginner tip: Before changing colors, place a marker through the first stitch of Round 3. This gives you a clear starting point for the petals.
Common mistake to avoid: Don’t crochet into the joining slip stitch as an extra stitch. Doing so changes the count and creates uneven petal spacing.
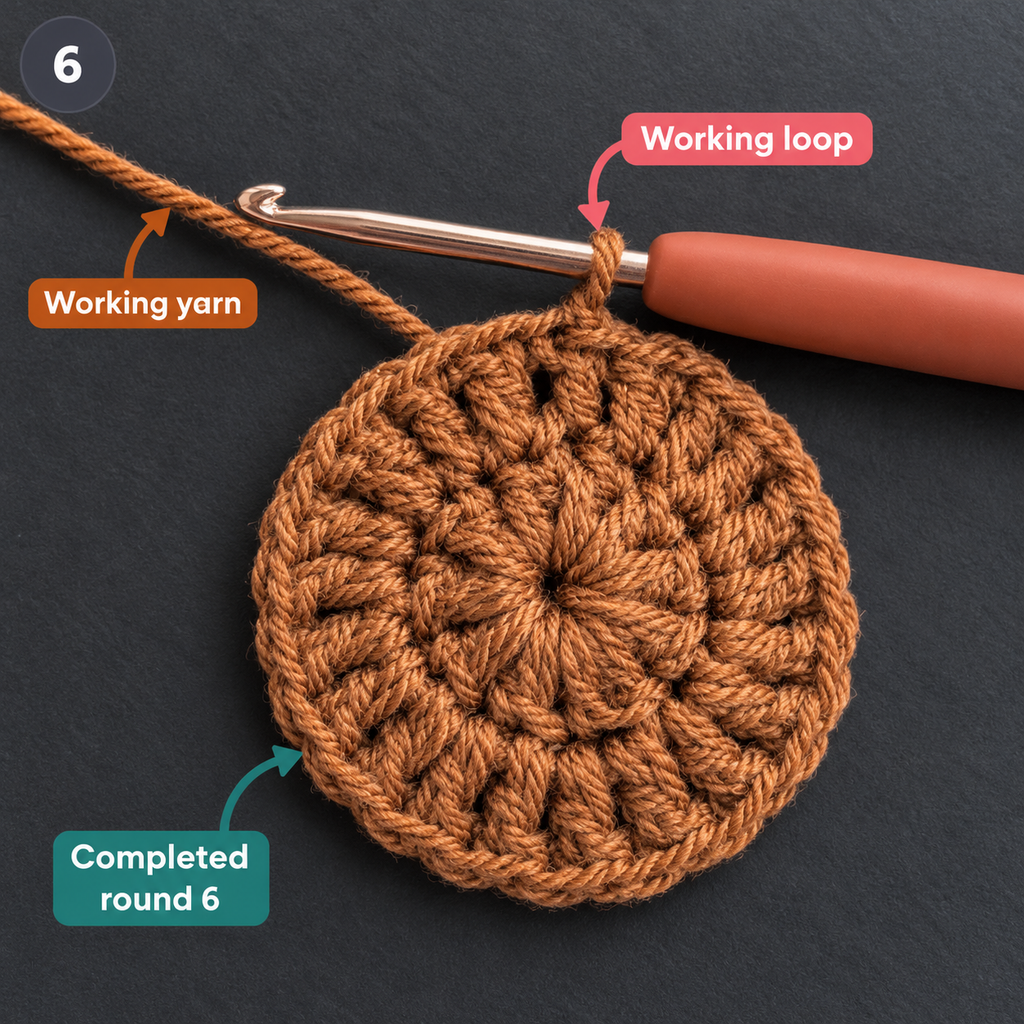
Part 2: Crochet the Yellow Sunflower Petals
Step 5: Attach the golden-yellow yarn
Cut your brown yarn, leaving a tail long enough to weave in later.
Take your golden-yellow yarn and attach it to the first stitch of the outer brown round with a slip stitch.
Don’t pull the new color too tightly. The yellow yarn should sit comfortably against the edge of the brown center.
You can hide the brown and yellow tails at the back of the work later.
If you prefer not to make a visible knot, leave the yellow starting tail loose and secure it with your tapestry needle when the flower is finished.
Beginner tip: Keep the right side of your sunflower facing you throughout the petal round. This helps the petals appear more consistent.
Common mistake to avoid: Joining into the space between two stitches instead of the top of a stitch can make your first petal sit lower than the others.
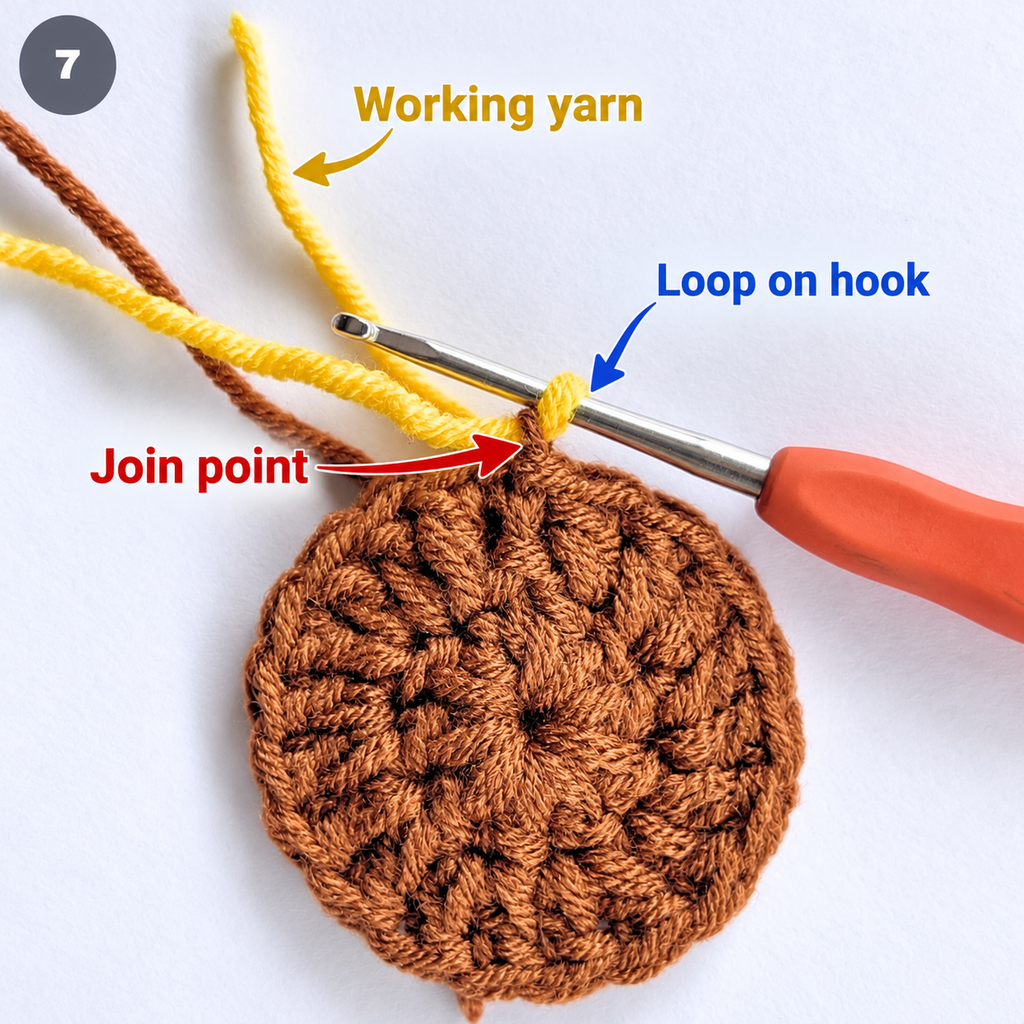
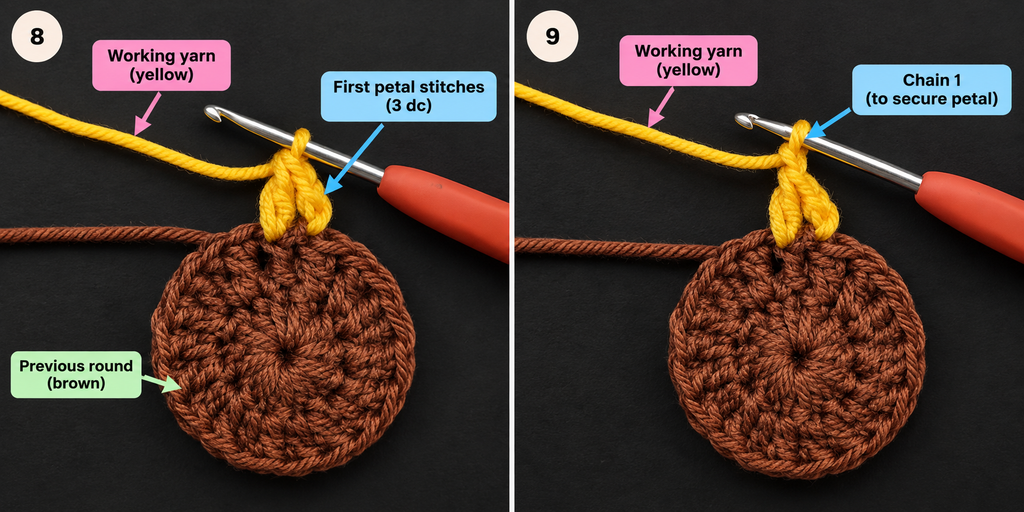
Step 6: Make your first pointed sunflower petal
The flower petals are formed with stitches of different heights. The shorter double crochet stitches sit close to the center, while the taller treble crochet stitches create the body of each petal.
A small picot forms the pointed tip.
For the first petal, work the following sequence:
- With the yellow yarn joined to the first brown stitch, chain 2.
- Work one double crochet into that same brown stitch.
- Work one treble crochet into the same brown stitch.
- Chain 2 and slip stitch into the second chain from your hook to form the picot.
- Work one treble crochet into the next brown stitch.
- Work one double crochet into that same second brown stitch.
- Chain 2, then slip stitch into that second brown stitch.
You’ve now used two brown stitches to make one sunflower petal.
The combination creates a tall, decorative petal that rises from the center, reaches a little point, and curves back down.
Don’t worry if the first petal looks slightly floppy. Once you’ve worked several around the center, they will support one another and create the familiar sunflower outline.
Beginner tip: The picot is the tiny point at the top. Make the slip stitch snug enough to hold the shape but not so tight that it bunches the treble stitches.
Common mistake to avoid: Check that the closing slip stitch goes back into the second brown stitch, not into the next unused stitch. Each petal must occupy exactly two brown stitches.
Step 7: Repeat until you have twelve petals
Once you’ve made your first petal, the rest of the flower is a repeated sequence.
You should have twenty-two unused brown stitches remaining.
Move directly to the next unused brown stitch and repeat the following instructions.
Petal repeat:
- Ch 2.
- Dc and tr into the next unused brown stitch.
- Ch 2, sl st into the second ch from hook to make the picot.
- Tr and dc into the following brown stitch.
- Ch 2, sl st into that same second brown stitch.
Repeat until you’ve made a total of twelve petals.
Every petal uses two stitches of the brown center. With twenty-four brown stitches available, the last petal should close neatly at the point where you began.
You won’t need to squeeze in another petal or skip a stitch at the end.
After your final petal, fasten off the yellow yarn and leave a tail for weaving in.
Your flower now has a complete ring of golden petals.
Beginner tip: Count the petals after completing the sixth. You should be halfway around the center. If you’re not, check whether you accidentally used more than two brown stitches for a petal.
Common mistake to avoid: Tall stitches can sometimes twist when worked tightly. Give each completed petal a gentle tug with your fingertips so that the tip faces outward.
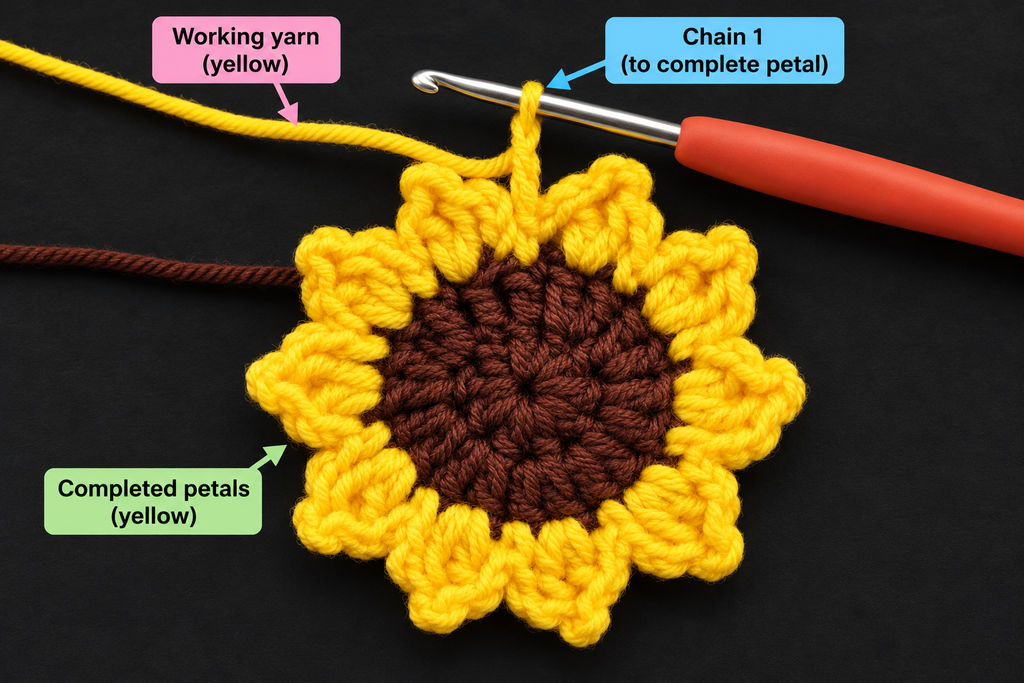
Step 8: Shape the sunflower petals
Before adding the leaves, take a moment to examine your flower.
Turn it so the right side faces upward and gently smooth the petals outward.
You should see twelve separate points surrounding the brown circle.
Some petals might lean slightly to one side. That’s normal, especially with cotton yarn.
Use your fingers to straighten any twisted stitches and adjust the spacing between petals.
Avoid pulling the tips too hard. The picot stitches are small and can stretch out of shape if handled roughly.
If the center curls slightly, place the sunflower flat on your blocking mat and see whether gentle shaping is enough to improve it.
Beginner tip: Make sure your petals all face the same side of the motif before you secure any loose ends.
Common mistake to avoid: Don’t try to flatten serious curling simply by stretching the petals. Check the center stitch counts and tension first.
Part 3: Crochet the Optional Green Leaves
A sunflower without leaves looks lovely as a small decorative motif, but the green leaves give it a more complete, botanical appearance.
For this tutorial, we’ll make two small oval leaves and attach them behind the flower.
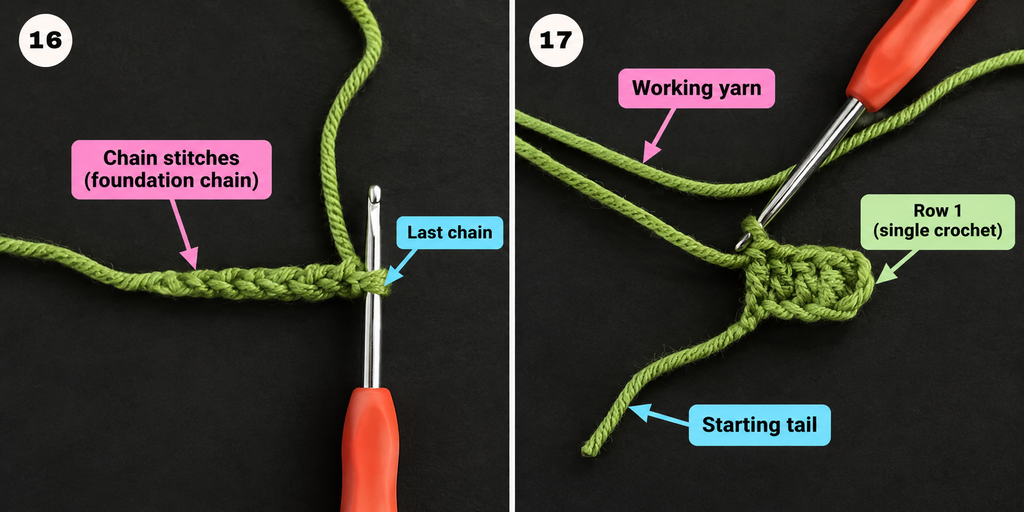
Step 9: Crochet a simple oval leaf
Start with your sage-green yarn and make a slip knot.
Chain 8.
Now work along the foundation chain.
First side of the leaf:
- Sc in the second chain from the hook.
- Hdc in the next chain.
- Dc in each of the next three chains.
- Hdc in the next chain.
- Sc in the final chain.
You have worked seven stitches along one side of the foundation chain.
Second side of the leaf:
Chain 1, turn the work around the end of the chain without flipping it over, and work along the opposite side of the original foundation chain.
- Sc into the underside of the first foundation chain position.
- Hdc in the next position.
- Dc in each of the next three positions.
- Hdc in the next position.
- Sc in the final position.
Slip stitch into the first single crochet to close the outline.
Fasten off, leaving a tail approximately 15 cm long for sewing.
The leaf should have a softly rounded oval shape, with a slightly fuller middle and narrower ends.
Make a second leaf in exactly the same way.
For a beginner, these leaves are a useful exercise in crocheting along both sides of a starting chain.
Beginner tip: Before turning to the underside, identify the remaining loops of the foundation chain. You’ll be crocheting into those loops rather than making a new chain.
Common mistake to avoid: Don’t add extra stitches at the two ends unless you’re deliberately changing the shape. Extra stitches can make the leaf ruffle or become too wide.
Step 10: Sew the leaves behind the sunflower
Place the sunflower face down on a clean, flat surface.
Position one green leaf behind the lower-left side of the flower, allowing approximately half the leaf to extend beyond the golden petals.
Place the second leaf behind the lower-right side.
The two leaves don’t need to be perfectly symmetrical. A slightly natural arrangement often looks better than an exact mirror image.
Thread the long yarn tail from the first leaf into your tapestry needle.
Pass the needle through the base of the green leaf and catch a few stitches on the back of the brown sunflower center.
Make several small, secure stitches.
Be careful not to push the needle all the way through the brown center where the green yarn would be visible on the front.
Repeat with the second leaf.
Turn the flower over and check the positioning before fastening the sewing tails securely.
Beginner tip: Use stitch markers to hold the leaves in position while sewing.
Common mistake to avoid: Attaching a leaf only to the ends of the yellow petals can cause the leaf to droop. Sewing it to the firmer brown center gives a more reliable connection.
Pattern Notes and Stitch Counts
The construction is straightforward once you understand how the rounds relate to one another.
| Section | Instructions | Result |
|---|---|---|
| Brown Round 1 | 8 sc in magic ring | 8 sts |
| Brown Round 2 | 2 sc in each stitch | 16 sts |
| Brown Round 3 | Repeat 2 sc, 1 sc | 24 sts |
| Yellow petal round | 1 petal over each pair of center stitches | 12 petals |
| Green leaf | Work around both sides of ch 8 | 1 leaf |
| Assembly | Sew 2 leaves behind center | Finished motif |
Turning chains: The beginning ch 1 of each brown round does not count as a stitch. The ch 2 at the start of each petal is part of the petal construction, not a separate center stitch.
Round joins: Join each brown round into its first actual single crochet, not into the beginning chain.
Right side and wrong side: Keep the same side of the center facing you while working the petals. The back is the side where you’ll weave in yarn ends and attach leaves.
Stitch count: Each petal consumes exactly two stitches from the 24-stitch center. The joining slip stitches do not create additional center stitches.
Repeat pattern: All twelve yellow petals use the same combination of chain, double crochet, treble crochet, picot, treble crochet, double crochet, chain, and slip stitch.
Adjusting size: Changing yarn weight and hook size is the simplest way to create a smaller or larger flower while keeping the stitch counts the same.
Common Beginner Mistakes and How to Fix Them
1. The brown center looks like a bowl
This usually happens when your stitches are too tight, the hook is too small for your yarn, or you have missed an increase.
First check the counts: eight, sixteen, and twenty-four.
If the counts are correct, try loosening your tension. You may also need a hook that’s 0.5 mm larger.
A little curling can often be corrected by blocking, but a badly cupped center is better fixed before adding petals.
2. The outer center becomes wavy
Waviness usually means the circle contains too much fabric for its circumference.
Double-check that you haven’t accidentally increased in every stitch of the third round.
Round 3 should alternate one increase with one regular single crochet.
Also make sure your foundation ring hasn’t loosened dramatically.
3. The flower ends with eleven or thirteen petals
Count the 24 stitches of the brown center again.
Each petal must use exactly two center stitches.
If a petal slips into three stitches, you’ll run out of space. If it reuses an already-worked stitch or advances incorrectly, petals may overlap or crowd.
It’s much easier to fix the spacing before fastening off the yellow yarn.
4. Some petals are taller than others
Check that you’ve used the same stitches in every petal.
A double crochet is shorter than a treble crochet. Accidentally replacing one with the other changes the shape.
Also check that each picot has the correct two-chain construction.
If the stitch sequence is correct, inconsistent tension may be the reason.
5. The pointed petal tips disappear
Your picot stitches may be too loose or too tight.
If the chains are very loose, the points can look rounded. If they’re too tight, the picot may disappear into the treble stitches.
Try making a few practice picots using spare yarn until you’re comfortable with the shape.
6. The green leaves twist or fold
This often happens when the stitches on one side of the foundation chain are much tighter than those on the other.
Work both sides at a similar tension and avoid pulling the foundation chain too tightly.
You can gently reshape a finished cotton leaf with water and blocking pins.
7. The yarn ends show at the front
Always weave in the ends through the back of the work.
Use a tapestry needle and pass each tail beneath several stitches of the matching yarn color.
Reverse direction once to help secure it, then trim only after the tail feels stable.
Don’t trim the tails too close to the fabric before securing them.
How to Customize Your Crochet Sunflower
One of the nicest things about this flower is how easily it can become part of another crochet project.
Experiment with yarn colors
Classic sunflower colors are always beautiful, but you can also try:
- Mustard yellow and chocolate brown for a vintage look.
- Butter yellow and caramel brown for a softer flower.
- Burnt orange and deep brown for autumn decorations.
- Cream petals with a golden center for a neutral cottage-style flower.
For leaves, olive green, sage green, and muted forest green all pair well with sunflower shades.
Make a miniature sunflower
Use sport-weight or fingering-weight cotton with a suitably smaller hook.
The same stitch sequence should produce a smaller flower, although the actual size will depend on your yarn and tension.
Mini sunflowers work well as embellishments for handmade cards, small accessories, or decorative sewing projects.
Make a larger sunflower
Try worsted or bulky yarn with a hook matched to the yarn.
Thicker yarn creates a fuller flower without needing to increase the number of petals.
Keep in mind that bulky yarn may make the petals heavier and less defined.
Add texture to the center
For a little extra surface detail, use a tapestry needle and a small amount of contrasting brown or golden yarn to embroider short seed-like stitches across the finished center.
Keep the stitches loose enough that the center doesn’t pucker.
Small embroidery details can make the sunflower look more botanical without requiring a complicated crochet stitch.
Add a decorative border
If you want the petals to look more defined, you can experiment with a contrasting edging.
For example, work slip stitches along the outside edges in a slightly deeper yellow.
This is an optional adaptation rather than part of the main pattern, so practice it on a spare flower first. Extra edging can make small petals curl if worked too tightly.
Ways to use your crochet sunflower
A flat sunflower is especially useful because it’s easy to attach to other projects.
Sew a flower onto a plain cotton tote bag, add it to the corner of a granny square blanket, or decorate a crochet bucket hat.
You can also make several flowers in different shades and stitch them onto a pillow cover.
For a handmade gift, attach one sunflower to a reusable gift wrap or a fabric pouch.
If you’re making a garland, use a strong thread or crocheted chain to connect the flowers at the back.
Be sure to fasten each flower securely so the finished decoration hangs evenly.
Finishing Instructions
Fasten off securely
After completing the petals, cut the yellow working yarn, leaving a tail long enough for weaving.
Pull the cut yarn through the final loop and tighten gently to secure it.
Do the same for both green leaves once they’re complete.
Weave in the ends
Thread each yarn tail through a blunt tapestry needle.
Working on the reverse side of the flower, pass the needle under several stitches of the matching color.
Change direction and weave through another few stitches for extra security.
For the brown center, make sure the original magic ring tail is secure. If the center hole begins to open, gently tighten it before weaving that tail in.
Only trim away the excess yarn when you’re confident the ends won’t come loose.
Block the sunflower if necessary
If the flower looks slightly uneven, blocking can help.
Check the care instructions for your particular yarn first.
For washable cotton yarn, lightly dampen the sunflower with clean water. Gently press out any excess moisture using a towel.
Place the motif on a suitable blocking surface and arrange the petals so that they point outward.
Use rustproof pins to hold the shape if needed, but don’t stretch the stitches aggressively.
Allow the flower to dry completely before removing the pins.
Washing and care
If the flower is sewn to a garment or bag, follow the care requirements of the most delicate material used.
Handwashing in cool water and drying flat is a cautious choice for many small cotton decorations.
Avoid wringing the petals, since this can distort the picots and stretch the stitch loops.
If the sunflower is purely decorative, occasional gentle dusting may be all it needs.
For items intended for babies or young children, sew the appliqué very securely and avoid detachable buttons, beads, pins, or other small parts that could become choking hazards.
Quick Printable-Style Summary
Easy Crochet Sunflower — Pattern Card Copy pattern
Skill: Confident beginner
Materials: DK cotton, 3.5 mm hook, tapestry needle, scissors
Brown center
- R1: 8 sc in MR. Join. (8)
- R2: Ch 1, 2 sc in every st. Join. (16)
- R3: Ch 1, [2 sc, 1 sc] × 8. Join. (24)
Yellow petals
Join yellow. For each pair of brown stitches, work:
Ch 2, dc and tr in first stitch, ch 2, picot sl st, tr and dc in second stitch, ch 2, sl st in second stitch.
Repeat over all 12 pairs of brown stitches.
Leaves (make 2)
Ch 8; along first side: sc, hdc, 3 dc, hdc, sc. Ch 1 and work the opposite side: sc, hdc, 3 dc, hdc, sc.
Finish: Sew leaves behind center, weave in ends, and gently shape.The pattern card uses compact notation. Refer to the full step-by-step explanation for exact placement of stitches and picots.
Frequently Asked Questions About Crochet Sunflowers
1. Is this crochet sunflower pattern good for beginners?
Yes, especially for beginners who already know the basic chain and single crochet stitches.
You’ll also use double crochet, treble crochet, slip stitch, and simple increases.
If any of those stitches are new to you, practice them with scrap yarn before starting the petals.
The flower is small enough to finish in one sitting, making it a useful confidence-building project.
2. How long does it take to crochet a sunflower?
A confident crocheter may complete a simple sunflower appliqué in under an hour.
Beginners should allow around 45–90 minutes for the flower and leaves, and perhaps a little longer if practicing the magic ring or treble crochet for the first time.
Once you become familiar with the petal repeat, the process will usually get quicker.
3. What is the best yarn for crochet sunflowers?
Cotton yarn is an excellent choice for flat sunflower appliqués.
It provides good stitch definition and makes it easier to see the shape of the petals.
DK-weight cotton is a practical option, but you can also use worsted-weight yarn or finer cotton for smaller decorations.
Choose a hook that gives you firm but comfortable stitches.
4. How do I keep my crochet sunflower flat?
Start by checking the stitch counts in the center.
If the counts are correct, make sure your tension isn’t too tight.
A center that curls upward may need a slightly larger hook.
After finishing, gentle damp blocking can improve the shape of many cotton motifs.
Remember that the petals may naturally rise slightly from the surface, even when the brown center is flat.
5. Can I make a crochet sunflower without a magic ring?
Yes.
If the magic ring is difficult, chain 4 and slip stitch into the first chain to form a small ring.
Then work the first eight single crochet stitches into the middle of that ring.
The center may have a small opening, which you can sometimes close further using the starting yarn tail.
This method is especially helpful for beginners who find the adjustable ring frustrating.
6. How do I make my crochet sunflower bigger?
The easiest method is to use thicker yarn and an appropriate larger hook.
You can create a bigger motif without changing the number of stitches or petals.
For an even larger flower with a wider center, you’d need to redesign the petal distribution and add suitable increases. Don’t simply add another center round and expect the same petal repeat to fit automatically.
7. Can I sew crochet sunflowers onto blankets, hats, or bags?
Absolutely.
Flat sunflower appliqués are particularly suitable for decorating other crochet and fabric projects.
Use matching yarn or strong sewing thread and stitch around the back of the center and selected petal bases.
Avoid pulling the sewing thread too tightly because this can distort the shape.
For items that will be washed frequently, secure the flower with multiple small stitches rather than attaching it at only one point.
Your Finished Crochet Sunflower
Once you’ve woven in all the ends and attached the leaves, your handmade sunflower is ready to use.
The golden pointed petals create a bright floral shape, while the brown center gives the motif its recognizable sunflower appearance.
You can leave the flower as a simple appliqué, sew it onto your favorite crochet bag, or make a handful in different shades for a handmade decoration.
If this is your first time crocheting flower petals, don’t worry if every point isn’t perfectly identical. Small differences are part of working with yarn by hand.
The most important things are that the center is secure, the stitch counts are correct, and the petals are attached firmly.
Conclusion
This easy crochet sunflower pattern is a lovely way to practice making circles, changing colors, and shaping petals without committing to a large project.
Once you’ve made one, it’s easy to imagine where the next flower could go: a tote bag, a blanket corner, a handmade gift, or a little string of sunflowers for your home.
Save this tutorial so you can return to it when you need a quick floral crochet project. And if you enjoyed making your sunflower, try crocheting a simple daisy or granny-square flower next.
Sometimes a little leftover yarn is all you need to make something cheerful.